Skip to Content
Design Engineering · Creative Tool · WebGL

IMG TO ASCII

GPU-Accelerated Creative Tool for Image-to-ASCII Transformation

Role
AI Design Engineer
Timeline
2025
Stack
React · WebGL2 · Three.js
AI
Claude Code · Cursor · Three.js
60fps on 4K Images
5 Production Export Formats
40+ Style Combinations

I Spotted a Gap in Creative Tooling

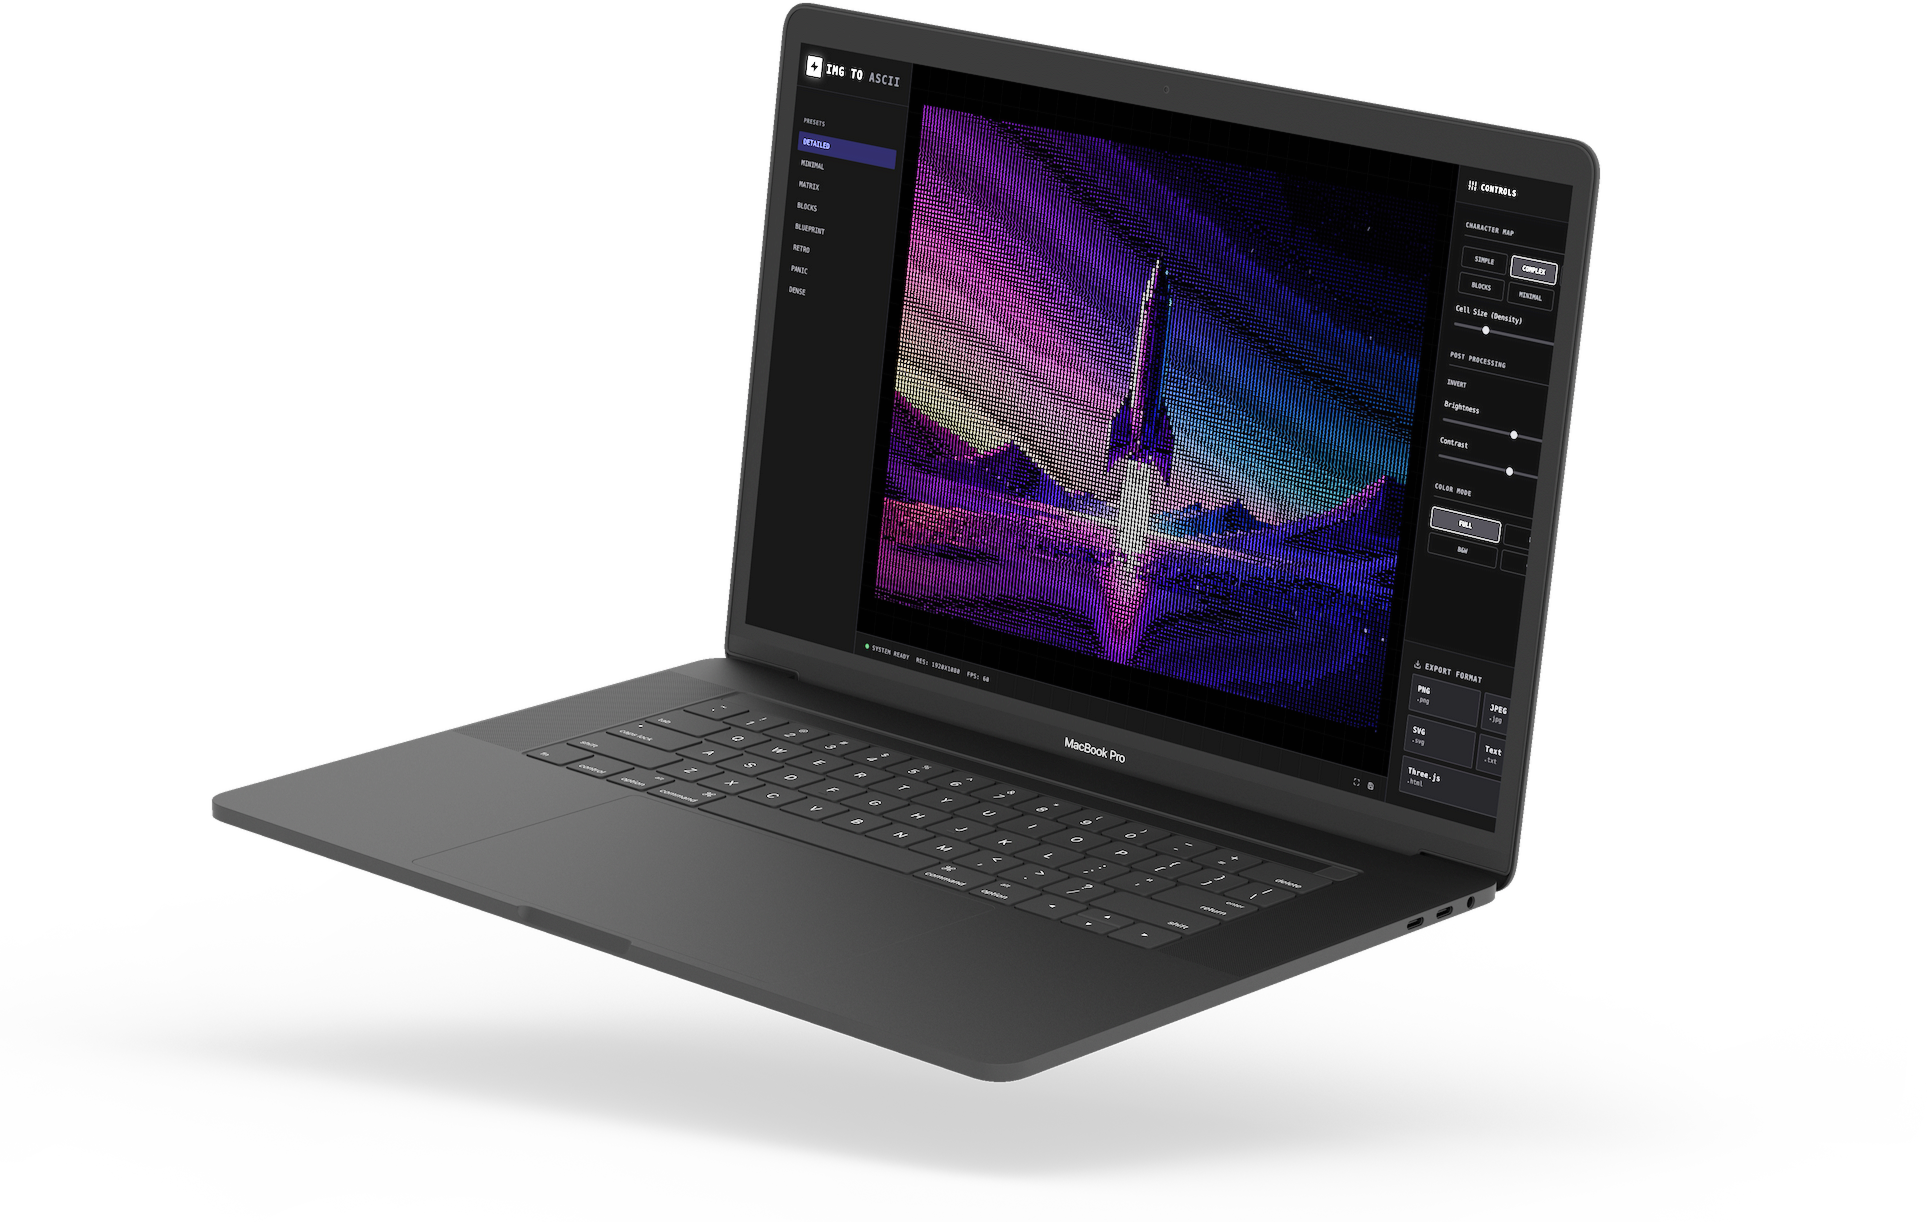
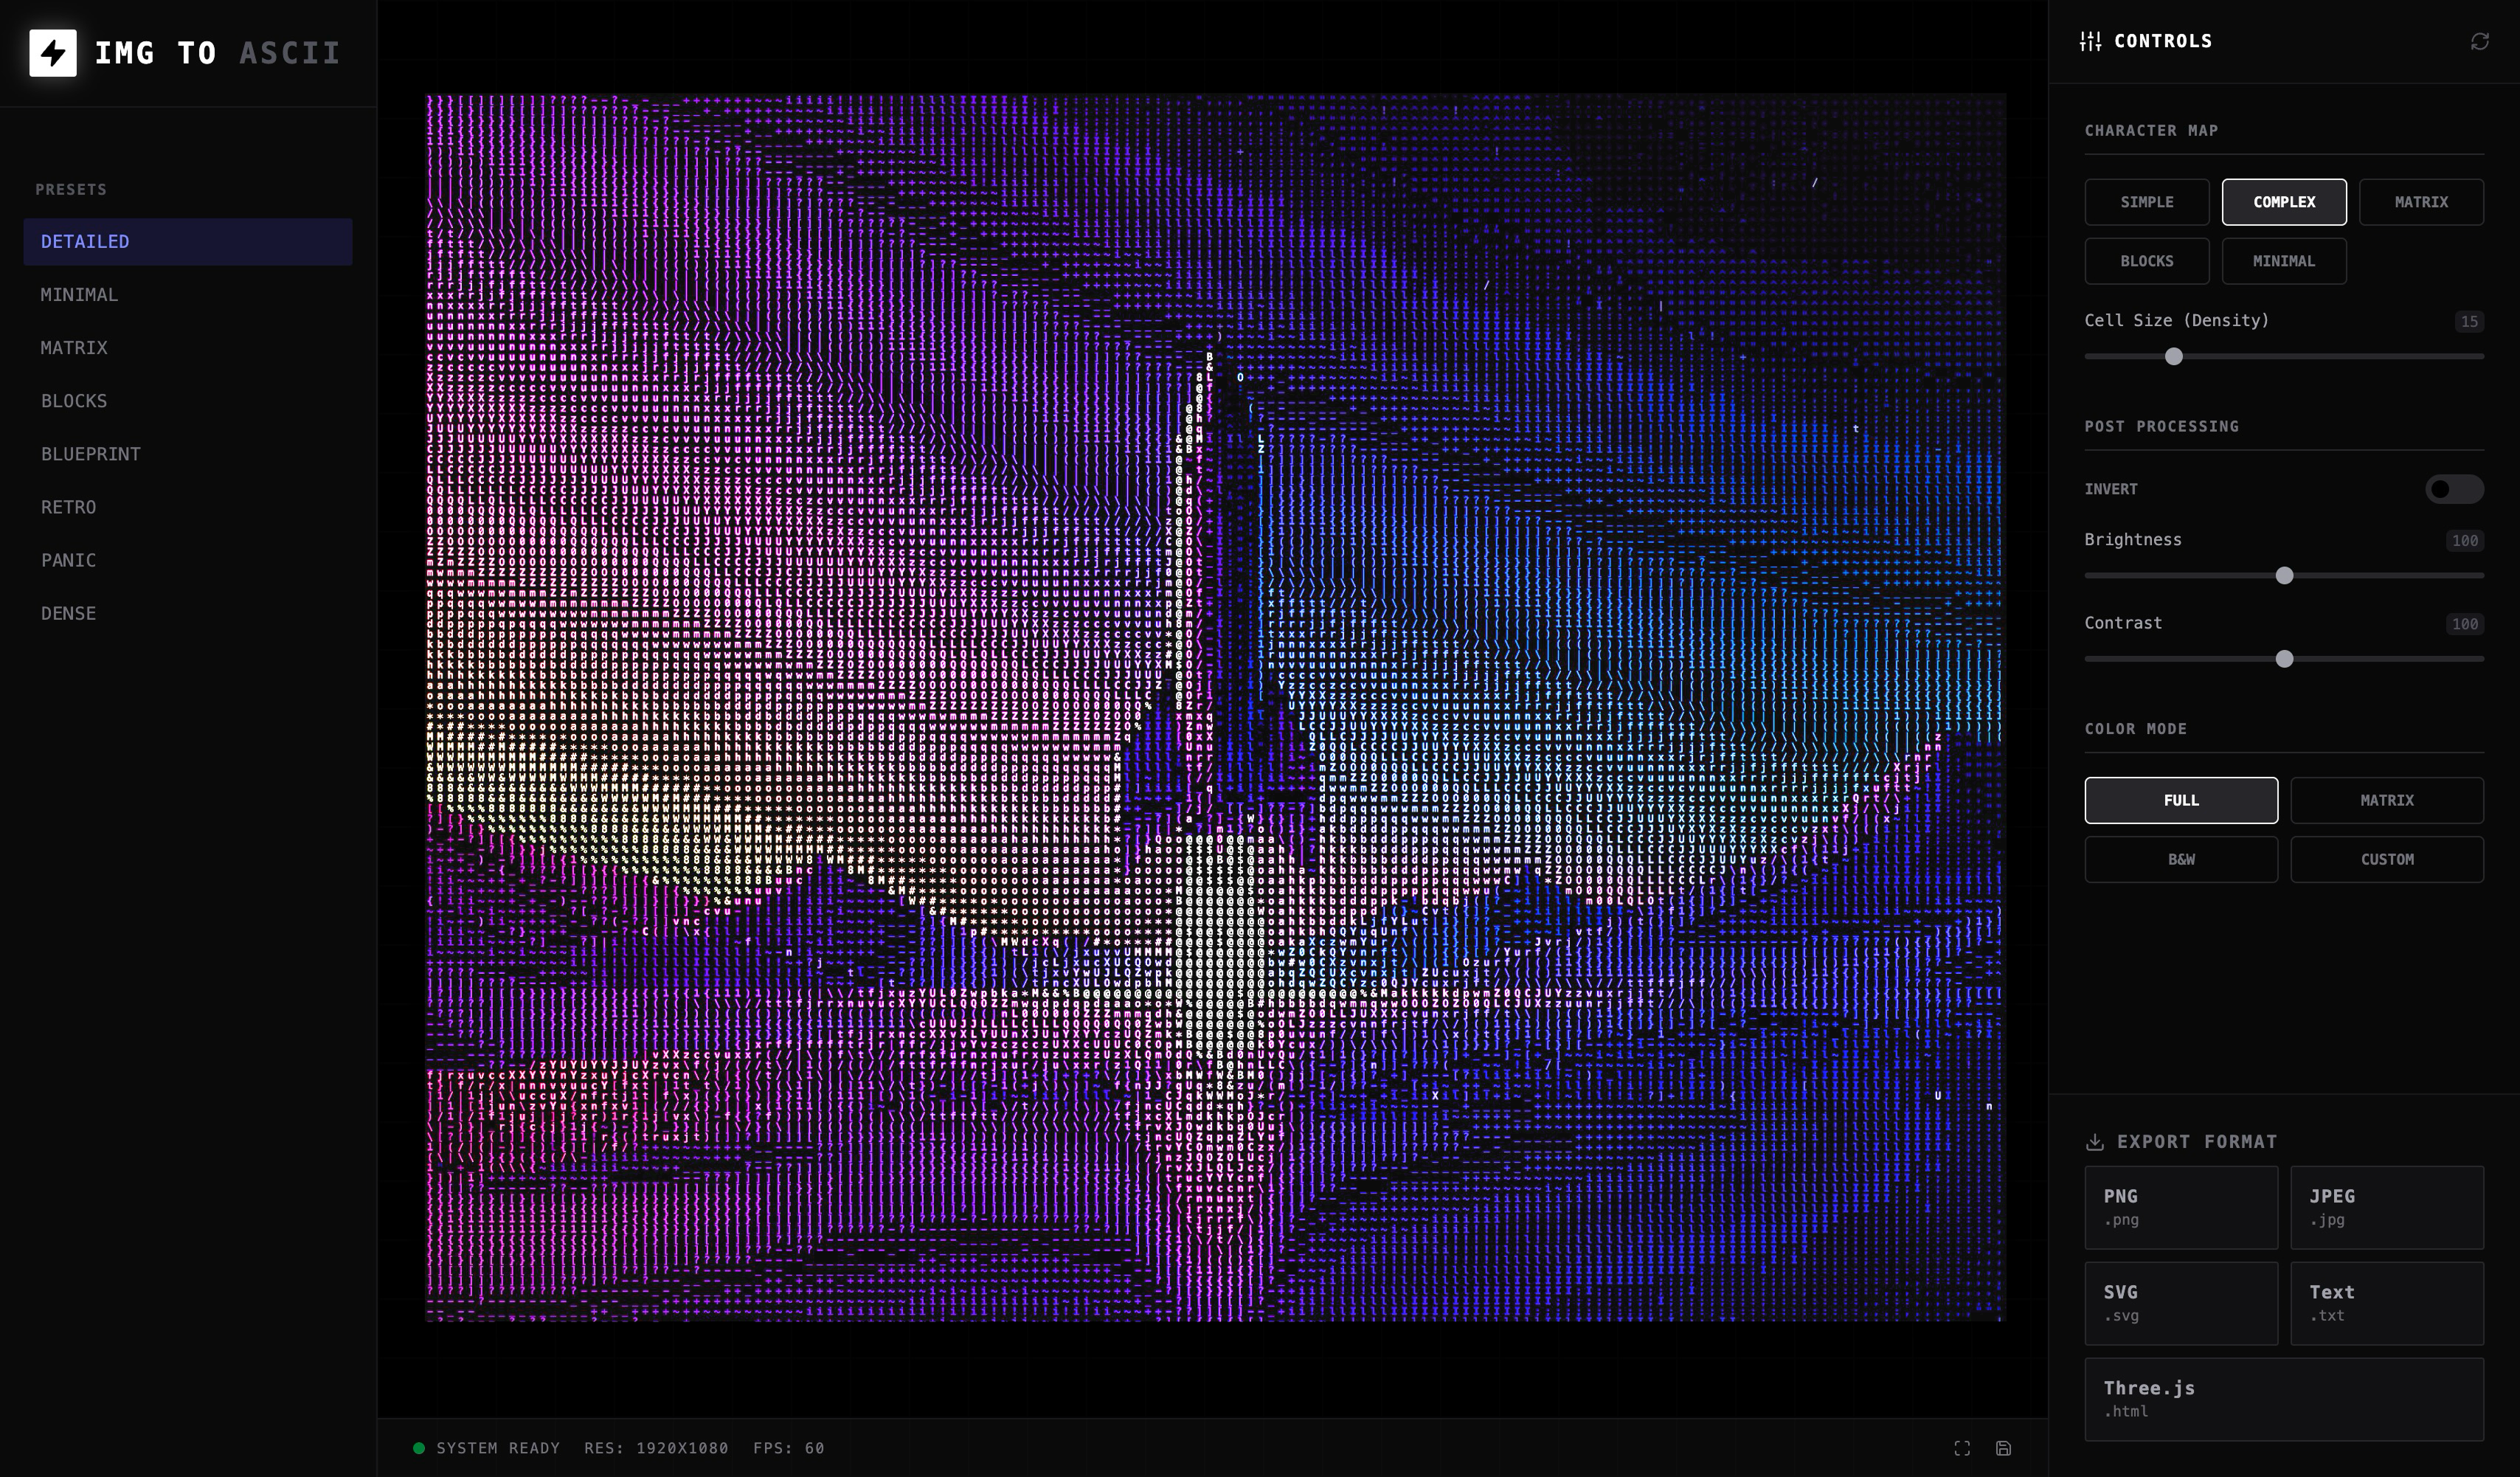
There is a recurring gap in creative tooling: Photoshop-level tools are powerful but heavy for rapid exploration, code-based visual tools are flexible but inaccessible to most designers, and experimental generators produce interesting outputs with weak control and poor export paths.

That leaves a practical unmet need: a lightweight tool that helps visual designers, art directors, and digital creators turn ordinary images into stylized assets quickly, with enough control to feel intentional rather than random.

The Designer
Wants ASCII texture for an album cover—spends an hour in a CLI tool with no preview. Needs instant visual feedback and preset exploration, not batch processing.
The Artist
Needs a retro terminal aesthetic for an installation—gets a web toy that outputs 200px images. Needs to try 5 different looks on the same image in seconds, then export as SVG.
The Developer
Wants an SVG ASCII header—finds zero tools that export vectors. Needs multi-format output that fits real downstream workflows, not just PNG screenshots.

The Real Problem

The UX problem was not “how to render ASCII art.” The real problem was how to compress a visually technical workflow into a product that feels immediate—how to make a niche aesthetic usable by non-technical creatives while preserving experimentation without overwhelming them with graphics-engine complexity.

For creative teams, style exploration is fragmented: image preparation in one tool, visual experimentation in another, cleanup in a third, export in yet another step. That fragmentation creates three costs: slower iteration, weaker creative confidence, and inconsistent output quality.

UX Hypothesis

If the product reduced the flow to upload → preset → refine → export, users could reach a satisfying result faster than in a traditional multi-tool workflow while still feeling in control of the final look.

I led the project end-to-end: product framing, core user workflow, information architecture, control model, visual language, export strategy, and technical implementation. This is the focused MVP of a larger vision called Ether Synth—a platform that could expand into glitch, dither, halftone, and motion treatments.

My Role
Product Strategy
UX/UI Design
Interaction Design
WebGL Engineering
Frontend Development
IMG TO ASCII running on MacBook Pro — side angle view

I Set Five Design Principles Before Writing Code

Rather than designing a broad “creative playground,” I designed a narrow but convincing product: one main job, one-screen workflow, immediate visual feedback, strong defaults, and export depth that suggests professional usefulness. That strategy made the product feel more commercial and more credible.

Focused, Not Feature-Heavy
Every visible element should help users get to a result faster. I deliberately excluded timeline editing, file management, multi-step wizards, and secondary editing modes.
Technical Underneath, Simple on Top
The graphics logic can be complex. The interface cannot feel complex. I hid shader variables behind creative decisions: density, character language, tonal treatment, color treatment.
Aesthetic Confidence
The product should feel like it has taste, not just capability. A dark, instrument-like interface supports the product’s identity—stronger focus on the preview, creative-tool credibility.
Fast Feedback = Creative Confidence
The preview should respond immediately so exploration feels low-risk and enjoyable. Instant rendering turns a technical tool into a creative instrument.
Export Is Part of the Promise
Users should not need another tool just to make the output usable. Export flexibility is what separates a production tool from a demo effect.

I Designed a Three-Panel Studio Interface

I studied Photoshop, Figma, and Blender—all use a three-panel pattern: input on the left, canvas in the center, output on the right. I chose this layout over a single-panel wizard because creative tools demand simultaneous visibility: users need to see presets, preview, and controls at the same time to build intuition.

The empty state reads "No Signal Input"—a deliberate UX decision to match the tool's signal-processing personality instead of generic "Upload a file" copy. The status bar shows Resolution, FPS, and render mode—giving power users the technical feedback they expect from professional software.

Deliverables
Three-panel layout
Empty state design
Status bar UI
Responsive behavior
IMG TO ASCII main interface with three-panel layout

I Built a Preset System for Creative Exploration

I designed eight presets—not five, not twelve—each delivering a visually distinct, immediately recognizable aesthetic direction: Matrix = neon green terminal, Blueprint = inverted technical-drawing, Panic = high-contrast alarm. Constraining the preset count was harder than expanding it; every addition had to justify its uniqueness.

The preset system does two jobs at once: it shortens the time to first satisfying result, and it demonstrates the expressive range of the tool. This matters commercially—a new user should feel the product is “worth it” before they understand every control, so presets serve as progressive disclosure from one-click results to manual sliders.

Deliverables
8 artistic presets
One-click activation
Active state highlighting
Parameter bundling
Preset rail showing Matrix, Blueprint, and Retro options

I Architected Instant-Feedback Controls

Control panel with character maps, sliders, and color modes

I grouped 15+ parameters into three conceptual clusters—Character Map, Post Processing, Color Mode—following the user's mental model of the transformation pipeline (input shape → processing → output style) rather than an arbitrary alphabetical list. Each control needed to be high-leverage: one slider change should produce a visible, meaningful shift in the output.

The critical design decision: zero “Apply” buttons—every slider, toggle, and picker updates the preview instantly. I chose reactive rendering over batch processing because the 200ms delay between action and result is the difference between “playing an instrument” and “filling out a form.”

Deliverables
Character Map selector
Density slider
Post-processing controls
Color mode system
Custom color picker

I Built a GPU-Accelerated Rendering Engine

I chose WebGL2 + GLSL ES 3.0 over Canvas 2D or server-side processing for one reason: latency kills creativity. The shader pipeline reads image texture, samples luminance per grid cell, maps brightness to ASCII characters from a pre-built atlas texture, and applies color—all in a single GPU draw call at 60fps on 4K images.

Canvas 2D would have been simpler to build but caps at ~5fps on large images; server-side would add network latency. I shipped GPU-first because the UX promise of “instant feedback” is meaningless if the rendering can't keep up with the user's hands on the sliders—reactive rendering triggers only on parameter change, so the GPU idles when the user is thinking.

Deliverables
Fragment shader pipeline
Character texture atlas
GPU memory management
Reactive rendering
1 draw call/frame

I Engineered Five Export Paths

Export flexibility is part of the UX, not an afterthought—a stylization tool becomes useful only when the result can leave the system in the right form. I mapped formats to real user workflows: PNG/JPEG for social media and print, SVG for scalable web assets, Plain Text for creative coding, and Three.js HTML for interactive 3D installations.

The Three.js export is the crown jewel—a standalone scene with orbit controls where users rotate and zoom their ASCII art in 3D space. I almost cut Plain Text to simplify the UI, but kept it after realizing creative coders paste ASCII into terminal art and code comments—each format serves a distinct audience, and that versatility separates a production tool from a demo.

Deliverables
PNG export
JPEG export
SVG vector export
Text export
Three.js 3D export
Export dialog with five format options

I Explored Various ASCII Aesthetic Directions

Each preset + color mode combination produces a distinct visual identity—I tested dozens of parameter bundles and curated the five most visually distinct outputs. Matrix green terminal, full-color pixel blocks, blueprint cyan monochrome, retro amber CRT, and dense high-detail colored ASCII, all from the same source image, prove the tool's range without switching inputs.

Matrix style ASCII output - glowing green Full color ASCII blocks Blueprint style ASCII - cyan and dark Retro amber terminal ASCII Dense detailed ASCII output
Deliverables
5 character sets
4 color modes
8 preset combinations
Real-time preview

I Mapped the Core User Journey

The primary flow has four steps—Upload, Preview, Tune, Export—but I designed it to feel like a single continuous action in the same three-panel view. No page transitions, no modals, no “Next” buttons.

The critical UX insight: creative exploration is non-linear—users jump between presets and manual controls, toggle color modes mid-session, and export multiple times with different settings. The interface had to support this back-and-forth without losing state or resetting parameters.

01 02 03 04 Upload Image Live Preview Tune Parameters Export Asset Drag & drop or click to load any image Instant GPU-rendered ASCII transformation Presets, characters, colors, post-processing PNG, JPEG, SVG, Text, or Three.js 3D scene iterate

I Shipped Through Five Focused Phases

01
Product Framing
Defined scope from the broader Ether Synth vision down to a focused ASCII MVP with clear user outcomes.
02
Interface Architecture
Designed the three-panel studio layout with preset rail, live canvas, and control rack inspired by professional creative software.
03
GPU Pipeline
Built a WebGL2 rendering engine with custom GLSL fragment shaders for real-time luminance-to-ASCII mapping.
04
Control Design
Mapped every parameter to instant visual feedback with reactive rendering—no batch operations, pure responsiveness.
05
Export Engineering
Implemented five export paths including Three.js 3D scene generation, making the tool production-ready for diverse workflows.

I Delivered Measurable Performance

60fps
on 4K Images vs. 2–5fps in typical ASCII converters
<16ms
Render Response Time single draw call, two texture lookups
5
Export Formats vs. 1 in average tools (PNG only)
0
Server Dependencies 100% client-side, no upload required
40+
Unique Style Combinations 8 presets × 5 charsets × 4 color modes

I Learned Three Critical Principles

1
Constraining the parameter space is harder than expanding it. Designing 8 presets required more judgment than offering 20—each one had to deliver a distinct, instantly recognizable aesthetic. Curation is a design skill.
2
Latency is a UX decision, not just a performance metric. The 200ms gap between slider movement and visual update is the difference between "playing an instrument" and "filling out a form." I chose GPU-first architecture specifically to protect this feeling.
3
Ship one module, validate the model. I scoped to ASCII-only MVP because validating the interaction pattern first—presets, GPU rendering, multi-format exports—reduces risk before expanding to Ether and Dithering modules. The constraint forced me to prove the interaction works before adding complexity.

I Directed Strategy; AI Accelerated Implementation

I directed product strategy, UX architecture, and all visual design decisions. AI tools accelerated implementation—specifically WebGL boilerplate, shader scaffolding, and Three.js export generation—but no AI is embedded in the shipped product itself. The split was deliberate: I own the "what" and "why," AI accelerates the "how."

Claude Code
Generated the initial GLSL fragment shader pipeline. I refined the luminance-to-character mapping formula and designed the character atlas texture layout. Claude wrote ~60% of WebGL boilerplate setup—I focused on the creative parameter architecture.
Cursor
Suggested the instanced mesh approach for Three.js 3D export, significantly reducing export file size. Used for rapid iteration on the reactive rendering pipeline and control state management across 15+ parameters.
Three.js Scene Generation
AI-assisted creation of the standalone 3D export with orbit controls, FontLoader integration, and camera positioning. I designed the export UX flow and format selection interface.

AI accelerated implementation speed but every design decision—three-panel layout, preset count, export format selection, control grouping, color modes—came from UX reasoning and competitive analysis, not AI suggestions. The next module (Ether) will be AI-first from the start.

I Know What's Next

IMG TO ASCII is an MVP—the first module of a larger vision called Ether Synth. I'm honest about the current scope and clear about the next iteration.

Canvas zoom & pan. Power users expect to inspect ASCII output at pixel level. Current implementation renders at fixed viewport scale—no magnification control.
Ether + Dithering modules. Two remaining Ether Synth modules: fluid particle visualization and halftone/dithering engine. Same three-panel architecture, shared preset system.
Functional status bar. Current status bar shows Resolution and FPS as decorative placeholders. Next version: live GPU memory usage, actual framerate counter, and dynamic resolution readout.
Batch processing & presets save. Users want to apply the same style to multiple images and save custom presets. Current architecture processes one image at a time with no persistence.

If I Can Make a Niche Graphics Pipeline Usable, Imagine What I Can Do With Yours

Ether Synth proves I can spot an under-served workflow, turn an aesthetic experiment into a product concept, and simplify complex technical systems into clear user value.

The same methodology applies to internal tools, data-heavy products, AI workflows, and operational software—anywhere users need power without complexity.

Let's Talk
Hero
Challenge
Principles
Interface
Presets
Controls
GPU Engine
Export
Styles
User Flow
Process
Results
Lessons
AI Layer
What's Next